Tuesday, December 18, 2012
I've Moved!
Hi, this is Sharron and I am so excited to tell you that Sharin' with Sharron is now hosted on Wordpress. Just click here! Please change your bookmarks so you can keep up with my latest activities!
Thursday, December 6, 2012
Winter and Holiday Active Play Ideas
'Tis the season for holiday celebrations and parties--whether they are in the classroom or with the family. What to do that is age appropriate for children and doesn’t involve sweet treats or a screen? The following active play ideas can be done indoors or outdoors depending on the space available and the weather. It’s time to begin the festivities and liven up the party!

Wrapping Paper Breakthrough. Set up boundaries using Cones or Hop Around Steps 15 to 24 feet apart. Two adults at the “finish line” hold a sheet of wrapping paper (~ 22” x 24”) with each hand on a corner. When you say, “Get ready, get set, run,” the child at the “start line” (with the palms of his hands touching and pointing forward) runs and breaks through the wrapping paper!
Reindeer Pull. Distribute a Jump Rope to a pair of children. The two children are hitched together by one child placing the rope around the waist of his partner who is a Reindeer (i.e., “Rudolph”) and the other child is “Santa” holding onto the rope ends or handles. When “Santa” gives the signal “Giddy up” the Reindeer, “Rudolph” is to gallop, moving forward. Add some fun holiday music, such as “Rudolph the Red-Nosed Reindeer or “Santa Claus is Coming to Town” When the music stops, have the children switch places, taking turns being “Rudolph” and “Santa.” This is a favorite activity as children go prancing around!
Snowball Throw. Give each child two pieces of white 8 1/2-by-11 inch scrap paper or 9-by-12 inch inexpensive easel paper. Have them wad each piece of paper up and make two “snowballs.” Divide the game playing area in half by placing a jump rope or clothesline on the ground. Divide the children into equal numbers and place them facing each other on opposite sides of the rope. Have the guests drop their snowballs onto the ground. Tell them to pick up their snowballs (one at a time) and throw them across the rope to the opposite side when the music starts. (I like to play the song "The Heat Is On”). Now we have a good old-fashioned Snowball Throw going on! The Snowball Throw is over when the music ends. For instant cleanup, have the children try to make a basket as they toss their snowball into a waste basket or brown paper grocer bag.
Holiday Musical Balloons. Give each child an inflated balloon. Christmas Colors: Red and Green. Hanukkah colors: Blue and White. Kwanzaa Colors: Black, Red and Green. I like to use 9” or 11” balloons that are of helium quality, as they are “thicker skinned” and do not pop as easily. Let each child write (help if needed) their name on the balloon with a permanent marker. Have children sit down in the open space. Instruct them to stand up and keep the balloon in the air using their hands when they hear music (play rockin’ holiday tunes). When the music stops they are to grab their balloon and sit down immediately. The game continues with the children “keeping” their balloons in the air when the music is playing and holding their balloon and sitting down when the music stops. Provide further physical challenges by asking the children to keep the balloons in the air with different body parts: one finger, an elbow, a knee, a foot, their head. Be creative!
Hang the Stockings. Christmas is coming and its time to hang the stockings on the fireplace. How fast can you do it? String a clothesline between two chairs or two trees. Provide baskets of assorted Christmas stockings (regular socks will work just as well) and spring-type Wooden Clothespins. Young children find enjoyment just in hanging them up. Its a fine motor skill, challenging children to use the small muscles in their fingers. Divide older children into teams and have them “beat the clock.”
Indoor Ice Skating. Attach paper plates to the bottom of children’s shoes with big rubber bands or by wrapping masking tape around the shoe and plate. The children are now ready to skate away. This technique works great on carpet. For hardwood or tile floors, simply wear a thick pair of wool socks. Add some music (i.e., “The Skater’s Waltz”) and play freeze skating. When the music is playing, “All Skate.” When the music stops, children freeze in place.
Ring the Bell. Hang a bell or Jingle Wrap from the ceiling or beam. Have children stand inside a Hoop and throw a Beanbag or Foam Ball and try to “Ring the Bell.”
Very Merry Christmas Wish. This game is based on the old Duck Duck Goose/Tisket a Tasket song activity. Have all the children sit down in a circle and choose one child to be “It.” “It” walks around the outside of the circle, holding the jingle bell or Jingle Wrap, while the group sings (to the tune: “A Tisket a Tasket”)
It's Christmas, It's Christmas,
And all our friends are with us.
I'll choose the one to give my wish
a Very Merry Christmas!
The child walking around with the jingle bell rings it and then drops it behind one of the children sitting there. That player picks up the bell and runs after “It,” who is running around the circle back to his place in the circle. The player holding the jingle bell is now “It” and walks around the outside of the circle, dropping the jingle bell behind someone who has not yet had a turn. The game ends when every player has had a chance to ring and drop the bell.
Scrambled Eggs and Icebergs. Tell the kids that when they hear the words "scrambled eggs," they are to jog around in the open space without bumping into each other. When they hear the word, "icebergs," they are to freeze in place without falling down. Tell them you'll also give them other movement commands, such as "jump," “march,” “tiptoe,” etc. When they hear the new command, they must switch to the new movement. Try to trick them by repeating a command twice in a row!
Monday, November 12, 2012
Infant and Toddler Movement Scarves
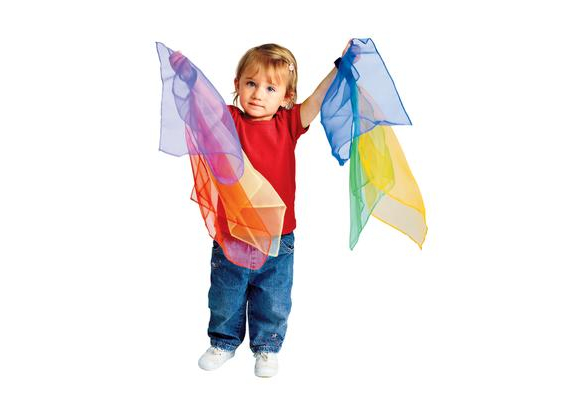
According to the National Association for the Education of Young Children, good toys for young children are ones that “match their stages of development and emerging abilities.” Toddler Movement Scarves (MOOVIT) are sized for the very young child (birth-36 months old). Each Toddler Movement Scarf consists of 3 colorful 10” square sheer scarves securely attached to a velcro wrist band. It’s an appropriate version of the “streamer ribbon” for the toddler set. Here are several fun activities that develop gross and fine motor skills, promote moderate to vigorous physical activity, and boost brain development. Get moovin’ and groovin’ with your little ones!
Floating Scarves Ages: birth-18 months
Lie the infant on its back and move the scarves above their face. Slowly move your hand up and down, in circles, and to the right and left. This activity provides practice with visual tracking.
Peek-A-Boo Ages: birth-18 months
Sit on the floor with the baby, and cover your face with the scarves. Take off the scarves and say, "Peek-a-boo." Do this a few times before trying it on the baby. Then cover the baby's head with the scarves. Stop immediately if the baby shows any sign of disliking this. Pull the scarves off and say "Peek-a-boo." Along with being fun, peek-a-boo teaches babies the concept of object permanence, which occurs somewhere between the ages of 4 and 12 months. A baby learns that even if something is out of sight, it still exists.
Peek-A-Toy Ages: 8-18 months
Sit on the floor with the baby. Cover a toy with the scarves and say, "Where's the toy?" Let the baby find the toy by pulling off the scarves. This activity promotes eye-hand coordination and fine motor skills.
Car Wash Ages: 8-18 months
Encourage gross motor development by attaching the scarves to a pole or chairs to create a tunnel or “car wash” for the baby to crawl through.
Movement Exploration Ages: 2 + years
Encourage children to use their imagination and be creative with the scarf. It can be a tail on a horse, a butterfly, a falling leaf, etc. Run with it and pretend it’s a kite. Look at the world through the tint of the fine mesh fabric. What do you see? What else can you do with your scarf? Movement exploration allows children to problem solve, explore spatial relationship skills, and use their large muscles.
Scarf Dancing Ages: 2 + years
Start the music and bodies start moving. With a scarf in their hand or around their wrist, encourage the children to dance and move about freely in the open space. Suggest to the children that they move the scarf fast, slow, high, low, side to side, and all around. Tell them that when the music stops, they are to stop and freeze (stand motionless like a statue). When the music starts again, children resume dancing. Ask children to follow along as you swish the scarf across the front of your body, make figure eights in the air, circle the scarf in front of your body like a Ferris wheel or circle it over your head like a helicopter blade.Try to trick the dancers by starting and stopping the music quickly. They love the element of surprise! Use all different types of music: fast, slow, classical, rock, salsa. When playing a slow song, suggest the children twirl, leap and float to the music. Scarf dancing promotes cross-lateral movements (crossing the midline) and develops body and space relationships, agility, flexibility, and listening skills.
Run Like the Wind Ages: 2 + years
On your mark, get set, get ready, GO! Have children run from one boundary to another with their scarf in hand or on their wrist. They will ask to do it again and again. Running, is a locomotor skill and a form of vigorous physical activity that increases the heart rate while improving fitness.
Musical Follow the Leader Ages: 2 + years
Play “Follow the Leader.” Have children stand in a line, one person behind the other. When the music starts, the child at the head of the line does a movement with the scarf and all children will move their scarf in the same way as the leader (i.e., waving scarf overhead, swinging arms back and forth, jumping with the scarf, galloping with the scarf, etc.) When the music stops the child that was at the front of the line goes to the back and the next child in line becomes the leader. The music starts again and the game continues until everyone has had a chance to be the leader.
Shake to My Lou Ages: 2 + years
Use the scarf as you sing the following song and do the appropriate movements
Shake to My Lou (Tune: “Skip to My Lou”)Shake, shake, shake to my Lou, (Shake scarf in front of body)
Shake, shake, shake to my Lou,
Shake, shake, shake to my Lou,
Shake to my Lou my darling.
Shake up high, shake down low, (Shake scarf overhead, then down by feet)
Shake up high, shake down low,
Shake up high, shake down low,
Shake to my Lou my darling.
Shake to the right, shake to the left, (Shake scarf on one side of body and then the other)
Shake to the right, shake to the left,
Shake to the right, shake to the left,
Shake to my Lou my darling.
Shake it out, shake it in, (Shake scarf with arms extended to the sides, bring arms together in front of body)
Shake it out, shake it in,
Shake it out, shake it in,
Shake to my Lou my darling.
Tuesday, October 9, 2012
No Child Left Inside! Extend Your Classroom Outdoors
Take your classroom outdoors! There is a huge focus on the Outdoor Classroom now, due in large part to Richard Louv’s book, “Last Child in the Woods,” which ignited a renewal of the return-to-nature movement for children. I grew up in the 1950s and 60s where we spent most of our childhood outside in natural settings, with lots of unstructured free time, and little or no adult supervision. Today many children are preoccupied with electronic devices, inside and in front of screens, eating junk food, and lacking in physical activity, let alone contact with nature. October 14-20 is “Take It Outside Week!” Head Start Body Start National Center for Physical Development and Outdoor Play (HSBS) created Take It Outside Week in 2009. The third week of every October marks a time to celebrate the natural world and encourage educators, families, and caregivers to make time outdoors an important part of young children’s daily lives. I support this and encourage you to visit my October 2011 post where I shared ideas and activities that you can include in your Outdoor Classroom.

My first job as an early childhood educator was that of an Outdoor Teacher at a parent co-operative preschool. Back then, in 1977, no one had even heard of a preschool teacher having a job as the “Outdoor Teacher.” Our preschool was behind a church and the classroom doors were always open to the outside playground which had a climbing structure anchored in sand and a bank of swings (three to be exact). My job, come rain or shine, was to organize and prepare the outdoor environment--taking out the wheel toys, sand toys, water tables, and setting up some outdoor learning centers, whether it be carpentry or an obstacle course.
This play yard was not in a natural setting. There was no grass nor trees to be found, only asphalt, an occasional bird or insect...and lots and lots of active children. It was probably the most popular area of the school. I discovered that my outdoor environment offered all the learning opportunities that one would typically find indoors--experiences in math, science, nature, social studies, dramatic play, art, music, language and literacy.
The outdoor program developed critical thinking, discovery, problem solving, and cooperative skills while supporting children’s continuous growth and learning--physically, socially, emotionally and cognitively. As the Outdoor Teacher for twelve years I was an observer and supporter of child-initiated play. During this time, I also took classes in child development, early childhood curriculum, music and movement, sensory motor integration, perceptual motor development, and physical activity and its connection to brain development. I eventually taught those same classes at several community colleges.
I am now traveling and sharing what I’ve experienced and learned as an Early Care and Education Teacher and Outdoor Teacher. I offer workshops and trainings on the Outdoor Classroom, doing some “Sharin‘ with Sharron” on what I have learned as an educator. On November 9 from 10:00 - 11:30 AM, I will be presenting a workshop at the 2012 NAEYC Annual Conference & Expo in Atlanta, Georgia titled, “NO CHILD LEFT INSIDE! Meeting Curriculum Standards with Concrete Outdoor Experiences.” Come join me and learn how to plan and implement outdoor activities that meet your learning outcomes and objectives even with limited outdoor space and resources.

Here’s one activity that promotes language, literacy and physical development that can literally be “rolled out” on the play yard.
ABC Walk & Toss
Materials Needed:
Alphabet Floor Mat with Markers (ABCWALK)
Alphabet Beanbags (ABCTOSS)
Classroom Activity Baskets (CATCHY)
Set Up:
Roll out the ABC Floor Mat in available space.
Put alphabet beanbags in plastic baskets.
Let’s Get Started:
Ask children to:
1. Find the letter that their name starts with on the mat and jump on it 5 times.
2. Toss the beanbag letter that their name starts with onto the matching letter on the mat.
3. Match all the alphabet beanbags to the matching letters on the mat.
4. Walk, jump or hop on the alphabet stepping stones while saying each letter.
5. Match the lowercase markers to the uppercase letters on the mat.
6. Match the lowercase markers to the lower case alphabet beanbags.
7. Sort the alphabet beanbags by color in the corresponding baskets.
8. Give each child one alphabet beanbags and ask them to find the matching letter on the mat and stand on it.
Furthermore:
1. With older children you can move on to recognizing the sounds of the letters. Say a sound of the alphabet and have the child stand on the letter represented by that sound. You can also have the child stand on each letter and indicate which sound the letter makes.
2. Using the alphabet beanbags, give one to each child and ask him/her to line up along the mat in order, following the order of the alphabet. You can also do it with the lowercase letter markers or the lowercase letters on the alphabet beanbags.
Learning Outcomes/Objectives/Standards:
• Language Development--Listening, Following Directions
• Literacy--Alphabet Knowledge--Letter recognition--Uppercase and lowercase
• Literacy--Alphabet Knowledge--Begin to recognize that letters have sounds
• Mathematics--Classification--Recognize when two things are the same
• Mathematics--Classification--Sorting beanbags by color to corresponding basket
• Physical Development--Fine & Gross Motor Skills
• Eye-hand coordination--throwing beanbag to matching letter
• Dexterity and Control--able to manipulate beanbag
• Balance and Control--able to balance when walking, jumping, etc.
• Locomotor Movements--walking, jumping, hopping
Discount School Supply® Product Recommendations:
Alphabet Floor Mat with Markers (ABCWALK)
Alphabet Bean Bags (ABCTOSS)
Classroom Activity Baskets (CATCHY)
My first job as an early childhood educator was that of an Outdoor Teacher at a parent co-operative preschool. Back then, in 1977, no one had even heard of a preschool teacher having a job as the “Outdoor Teacher.” Our preschool was behind a church and the classroom doors were always open to the outside playground which had a climbing structure anchored in sand and a bank of swings (three to be exact). My job, come rain or shine, was to organize and prepare the outdoor environment--taking out the wheel toys, sand toys, water tables, and setting up some outdoor learning centers, whether it be carpentry or an obstacle course.
This play yard was not in a natural setting. There was no grass nor trees to be found, only asphalt, an occasional bird or insect...and lots and lots of active children. It was probably the most popular area of the school. I discovered that my outdoor environment offered all the learning opportunities that one would typically find indoors--experiences in math, science, nature, social studies, dramatic play, art, music, language and literacy.
The outdoor program developed critical thinking, discovery, problem solving, and cooperative skills while supporting children’s continuous growth and learning--physically, socially, emotionally and cognitively. As the Outdoor Teacher for twelve years I was an observer and supporter of child-initiated play. During this time, I also took classes in child development, early childhood curriculum, music and movement, sensory motor integration, perceptual motor development, and physical activity and its connection to brain development. I eventually taught those same classes at several community colleges.
I am now traveling and sharing what I’ve experienced and learned as an Early Care and Education Teacher and Outdoor Teacher. I offer workshops and trainings on the Outdoor Classroom, doing some “Sharin‘ with Sharron” on what I have learned as an educator. On November 9 from 10:00 - 11:30 AM, I will be presenting a workshop at the 2012 NAEYC Annual Conference & Expo in Atlanta, Georgia titled, “NO CHILD LEFT INSIDE! Meeting Curriculum Standards with Concrete Outdoor Experiences.” Come join me and learn how to plan and implement outdoor activities that meet your learning outcomes and objectives even with limited outdoor space and resources.
Here’s one activity that promotes language, literacy and physical development that can literally be “rolled out” on the play yard.
ABC Walk & Toss
Materials Needed:
Alphabet Floor Mat with Markers (ABCWALK)
Alphabet Beanbags (ABCTOSS)
Classroom Activity Baskets (CATCHY)
Set Up:
Roll out the ABC Floor Mat in available space.
Put alphabet beanbags in plastic baskets.
Let’s Get Started:
Ask children to:
1. Find the letter that their name starts with on the mat and jump on it 5 times.
2. Toss the beanbag letter that their name starts with onto the matching letter on the mat.
3. Match all the alphabet beanbags to the matching letters on the mat.
4. Walk, jump or hop on the alphabet stepping stones while saying each letter.
5. Match the lowercase markers to the uppercase letters on the mat.
6. Match the lowercase markers to the lower case alphabet beanbags.
7. Sort the alphabet beanbags by color in the corresponding baskets.
8. Give each child one alphabet beanbags and ask them to find the matching letter on the mat and stand on it.
Furthermore:
1. With older children you can move on to recognizing the sounds of the letters. Say a sound of the alphabet and have the child stand on the letter represented by that sound. You can also have the child stand on each letter and indicate which sound the letter makes.
2. Using the alphabet beanbags, give one to each child and ask him/her to line up along the mat in order, following the order of the alphabet. You can also do it with the lowercase letter markers or the lowercase letters on the alphabet beanbags.
Learning Outcomes/Objectives/Standards:
• Language Development--Listening, Following Directions
• Literacy--Alphabet Knowledge--Letter recognition--Uppercase and lowercase
• Literacy--Alphabet Knowledge--Begin to recognize that letters have sounds
• Mathematics--Classification--Recognize when two things are the same
• Mathematics--Classification--Sorting beanbags by color to corresponding basket
• Physical Development--Fine & Gross Motor Skills
• Eye-hand coordination--throwing beanbag to matching letter
• Dexterity and Control--able to manipulate beanbag
• Balance and Control--able to balance when walking, jumping, etc.
• Locomotor Movements--walking, jumping, hopping
Discount School Supply® Product Recommendations:
Alphabet Floor Mat with Markers (ABCWALK)
Alphabet Bean Bags (ABCTOSS)
Classroom Activity Baskets (CATCHY)
Wednesday, September 12, 2012
Education Through Movement! Building the Foundation

This summer I had the privilege of attending a week long HighScope® training on music and movement. As a movement and physical activity specialist, I was thrilled to have the opportunity to participate in this highly respected professional development course.
I met people from all over the world--India, Dutch Caribbean, Puerto Rico, Mexico, and the United States, from Michigan, Tennessee, Maine, New Hampshire, Pennsylvania, Georgia, and Washington. I did a lot of moving, dancing, and singing while learning new strategies and techniques for sharing music and movement with young children and successful methods for integrating movement and music into other curriculum areas. Here are several that stood out and which I am beginning to incorporate in my teacher trainings and workshops:
Ask the children to describe movements as they are doing them. Having children think about and label their movements leads to those movements becoming purposeful and planned. For example, “I am patting my knees with my hands.” Children develop language skills as well as self-confidence.
Once children are comfortable with a movement activity, suggest that they lead it in their own way. Depending on the activity and the length of time available, one, a few, or all of the children can be leaders. Over time, make sure that every child has a chance to lead some activities.
Use only one method of presenting an activity or concept. Give verbal directions or silently demonstrate the movement or silently provide tactile guidance. Children respond better when you use only one presentation method.
Remember the child’s pitch range for singing is high--sing higher. Children have short vocal chords and will sing in tune more easily when you pitch songs in their higher range (middle C to A on the piano). As an adult, you may need to call the cat (“Here kitty, kitty”) to feel that place in your voice that is best for children and lead from there.
Steady beat is the consistent repetitive pulse that lies within every rhyme, song, or musical selection. Pat steady beat with both hands or rock to the steady beat. Mother Goose nursery rhymes are wonderfully appropriate for incorporating steady beat.
Action, thought, and language are combined in “Learner SAY & DO,” a strategy that helps children organize steady beat movements and movement sequences. Children speak words that define actions or body parts touched (SAY) and the match the movement to the words (DO). For example, to learn the locomotor movement of marching, children say “March” each time weight is alternatively transferred from one foot to the other.
When first introducing equipment (balls, scarves, bean bags, rhythm instruments, etc.) to children, allow for opportunities to freely explore and play with it before expecting them to use the equipment correctly. Don’t just jump into the “game or activity” you have planned. It’s fun to put out several different pieces of equipment together and see what the children do with all of the pieces, whether exploring them individually or using the pieces together with a friend.
To acquire children’s attention while moving, sing “YOO-HOO” and have the group echo it back to you as they cease all activity. You can also say, “STOP SIGN.” Then you are able to give directions for the next activity or movement.
As you introduce movement experiences to children, remember these “golden rules:”
- Keep them short.
- Keep them simple.
- Make them enjoyable.
- Design them to assure success.
- Suggest rather than direct.
To learn more about the HighScope® Preschool Curriculum (HIGHSCOPE) visit www.DiscountSchoolSupply.com.
Wednesday, July 11, 2012
Summer Mini-Olympics
The Summer Olympic Games will take place from July 27 to August 12, 2012 in London, England. But just don’t let the kids sit and watch, why not hold your own Mini-Olympics? Involve them in all the fun physical activity by staging a kid-friendly version on the playground or in your own backyard.
Opening Ceremonies
Provide materials for each child to make their own Olympic Flag (FLAGS). Kick-off your Mini-Olympics Day with a parade as the children march around holding their flags. Play music, such as the Olympic theme or “Star-Spangled Banner.”
Events
In setting up a developmentally appropriate Mini-Olympic Day for young children remember to provide opportunities for every child to voluntarily choose from a variety of Olympic-style events. Set up stations where children can move from one event to another at their own pace and rate. Remind the children that finishing first is not as important as having a good time. The emphasis is more on fun than on skill.
Before starting any of the events, lead the children from station to station and explain and/or demonstrate the “how-to’s” or challenges of the event at each station. To get started, divide the class or group into equal numbers according to the number of stations set up. This eliminates children standing in a long line and waiting for their turn. For example, if you have 6 stations and 24 children, you would put 4 kids are each station. With a blow of a whistle (WHIS), children begin the physical challenge of the event. When they have completed that event they move on the next one and so forth until they have completed all the stations. And, of course, they can go through them again and again!
Let The Games Begin
• Target Toss (Archery): Draw a large circle on the asphalt using sidewalk chalk (SIDEWALK). Make smaller circles or place shape spots (SHSPOT) inside the large circle as targets. The players take turns tossing beanbags from a specified throwing line until they hit a target.
• Running Races (Track and Field): Set up start and finish lines about 15-30 feet apart. Challenge the racers to run, walk backwards, gallop, crab walk or creep on hands and knees to get from the start line to the finish line.
• Throwing for Distance (Shot Put): Use a small sensory ball (SENBALL) or a tightly wrapped ball of aluminum foil for your makeshift shot put. Show the kids how to hold the ball near the ear and launch it forward by extending the arm. They cannot move their feet. How far can they throw the ball?
• Jumping (Equestrian Jumping): Set up two cones fifteen feet apart. Have kids “saddle up” a ball hopper (horse), hold the handle and jump to the opposite cone and back again.

• Disc Toss (Discus Throw): Using a Frisbee or flying disc (FLYD), child will throw the disc (throw away from the waist with a flick of the wrist) as far as he/she can. How far did it “fly?”
• Kicking (Soccer): Set up a soccer goal (GOAL) a least fifteen feet from a specified kicking line. Players stand behind the line and kick a soccer ball (SOC) into the goal.
 • Gymnastics (Olympic Gymnastics): Put out a tumbling mat (TMAT) and encourage children to freestyle dance with a streamer ribbon, do a trick with a hoop, and perform simple acrobatics (tumble, twirl, spin, etc.)

• Canoe Race (Canoeing and Kayaking): Set up five cones for children to weave through as they ride (sitting, kneeling or prone position) their scooter board or roller board kayak or canoe.
Closing Ceremonies
It doesn’t matter if there are no medals distributed for this Summer Mini-Olympics. What’s really important is how much fun everyone had as they played together and cheered each other on. Remember, the Olympics are a celebration of friendship, unity and peace!
Discount School Supply® Product Recommendations:
Canvas Flags (FLAGS)
Whistle (WHIS)
Colorations® Washable Sidewalk Chalk (SIDEWALK)
Target Toss Game (TTBB)
Shape Spots (SHSPOT)
Colored Beanbags (CBB)
Whopper Hopper (WHOPHOP) and Mini Hopper (HOP)
Sensory Balls (SENBALL)
Brawny Tough Activity Hoops (HOOPSET)
Soccer Ball (SOC)
Soccer Goal (GOAL)
Flying Discs (FLYD) and Soft Flying Discs (FDISC)
Rainbow Dancing Wrist Bands (RNBW)
Angeles® Tumbling Mat (TMAT)
Roller Board (ROLLIT)
Colored Cones (SETC)
Start to Finish (STRTFIN)
Opening Ceremonies
Provide materials for each child to make their own Olympic Flag (FLAGS). Kick-off your Mini-Olympics Day with a parade as the children march around holding their flags. Play music, such as the Olympic theme or “Star-Spangled Banner.”
Events
In setting up a developmentally appropriate Mini-Olympic Day for young children remember to provide opportunities for every child to voluntarily choose from a variety of Olympic-style events. Set up stations where children can move from one event to another at their own pace and rate. Remind the children that finishing first is not as important as having a good time. The emphasis is more on fun than on skill.
Before starting any of the events, lead the children from station to station and explain and/or demonstrate the “how-to’s” or challenges of the event at each station. To get started, divide the class or group into equal numbers according to the number of stations set up. This eliminates children standing in a long line and waiting for their turn. For example, if you have 6 stations and 24 children, you would put 4 kids are each station. With a blow of a whistle (WHIS), children begin the physical challenge of the event. When they have completed that event they move on the next one and so forth until they have completed all the stations. And, of course, they can go through them again and again!
Let The Games Begin
• Target Toss (Archery): Draw a large circle on the asphalt using sidewalk chalk (SIDEWALK). Make smaller circles or place shape spots (SHSPOT) inside the large circle as targets. The players take turns tossing beanbags from a specified throwing line until they hit a target.
• Running Races (Track and Field): Set up start and finish lines about 15-30 feet apart. Challenge the racers to run, walk backwards, gallop, crab walk or creep on hands and knees to get from the start line to the finish line.
• Throwing for Distance (Shot Put): Use a small sensory ball (SENBALL) or a tightly wrapped ball of aluminum foil for your makeshift shot put. Show the kids how to hold the ball near the ear and launch it forward by extending the arm. They cannot move their feet. How far can they throw the ball?
• Jumping (Equestrian Jumping): Set up two cones fifteen feet apart. Have kids “saddle up” a ball hopper (horse), hold the handle and jump to the opposite cone and back again.
• Disc Toss (Discus Throw): Using a Frisbee or flying disc (FLYD), child will throw the disc (throw away from the waist with a flick of the wrist) as far as he/she can. How far did it “fly?”
• Kicking (Soccer): Set up a soccer goal (GOAL) a least fifteen feet from a specified kicking line. Players stand behind the line and kick a soccer ball (SOC) into the goal.
• Canoe Race (Canoeing and Kayaking): Set up five cones for children to weave through as they ride (sitting, kneeling or prone position) their scooter board or roller board kayak or canoe.
Closing Ceremonies
It doesn’t matter if there are no medals distributed for this Summer Mini-Olympics. What’s really important is how much fun everyone had as they played together and cheered each other on. Remember, the Olympics are a celebration of friendship, unity and peace!
Discount School Supply® Product Recommendations:
Canvas Flags (FLAGS)
Whistle (WHIS)
Colorations® Washable Sidewalk Chalk (SIDEWALK)
Target Toss Game (TTBB)
Shape Spots (SHSPOT)
Colored Beanbags (CBB)
Whopper Hopper (WHOPHOP) and Mini Hopper (HOP)
Sensory Balls (SENBALL)
Brawny Tough Activity Hoops (HOOPSET)
Soccer Ball (SOC)
Soccer Goal (GOAL)
Flying Discs (FLYD) and Soft Flying Discs (FDISC)
Rainbow Dancing Wrist Bands (RNBW)
Angeles® Tumbling Mat (TMAT)
Roller Board (ROLLIT)
Colored Cones (SETC)
Start to Finish (STRTFIN)
Monday, June 4, 2012
Hoop Fun All Around!
Kids have played with hoops for thousands of years. Twisted grape vines kept children amused in ancient Egypt. The Greeks used hooping as a form of exercise. No company or single inventor can claim that they invented the first hoop. Around 1300, hooping came to Great Britain and homemade versions of the toy became very popular. In the early 1800s, British sailors first witnessed hula dancing in the Hawaiian Islands. During their stay, the soldiers realized the resemblance of the movement of the hips of the traditional hula dances to the movements of people that go hooping...and the name "hula hoop" came together. The hoop gained international popularity in the late 1950s and was eventually inducted into the Toy Hall of Fame in 1999.

The activity hoop (HOOPSET) or hula hoop (HULA) is a popular play prop that begs to be played with OUTDOORS! It is usually twirled around the waist, limbs or neck but this “traditional hooping” can be difficult for young children to do. Here are some other ways to keep the fun going around, and around, and around, and around...

Hoop Chase: Roll hoops on the ground in an open area. Children have fun running, and catching the hoop, and then shouting, “I Gotcha!” Add to the fun by rolling more than one hoop at a time and see which one the child decides to chase.
Ring the Target: Set up a target such as a cone (SETC) or a gallon jug (filled with water or sand to weigh it down). Have children stand in another hoop (HOOPLA) a distance away from the target and toss or throw a hoop to land around the target. Start close and slowly increase the distance.
Make a Basket: Hang the hoop (“basket”) from a tree branch or some other spot where balls can be safely thrown. Have children stand in another hoop a distance away from the basket and toss or throw a ball (SOFTFOAM) or bean bag (CBB) through the basket. Start close and slowly increase the distance.
Around the World: Have children join hands in a circle with a hoop (LGHOOP) hanging from one person’s arm. When play begins, the person with the hoop must step through it and pass it to the next player without letting go of their hands. The next player does the same thing. The goal is to get the hoop back to the starting player with no one letting go of their neighbor’s hands. I like to add some music (“I Want to Hold Your Hand” by The Beatles) while the game is being played.

Hoop Jumping: Like rope jumping but using a big hoop (LGHOOP). Hold hoop in front of your body. Step over the hoop. Move your arms forward and swing the hoop over your head. Let the hoop hit the ground. Jump over the hoop, taking off and landing on both feet. Continue practicing these steps until you can continuously jump over the hoop.
Hoop Obstacle Course: Thread one pole (POLES) horizontally through lower level holes in two cones (CONES) to make a crossbar for jumping over. Place four hoops (HOOPLA) in a hopscotch pattern for children to jump into (first one hoop, then two hoops side by side, then one last hoop). Then make a tunnel with four cones (CONES) and two large hoops (LGHOOP) (lay two cones on their sides and across from each other, insert hoop into top notch. Duplicate with the other two cones and the hoop). Have children go through the tunnel on hands and knees. Now give children a hoop to roll in and out of a zigzag pathway made by placing 4-6 Hop Around Steps (HOPPA) in a row, four feet apart from each other. Finish the course by having children Ring the Target (see set up above).
Show Me: Ask children to place their hoop on the ground in front of them. Ask the children to, “Show me how you can jump into the hoop. Jump out of the hoop. Walk around the hoop. Put your elbow in the hoop. Put your whole body over the hoop. Stand inside your hoop. Lift the hoop over your head. On the count of three drop the hoop.” The challenges are limitless...and the children will give suggestions of what they can “show you!”
Hoop play promotes agility, coordination, cooperation, gross motor development, and physical activity. I have shared in older posts more games and activities that use the hoop. You can read them here:
Driving with Hoops!
Why Play Musical Chairs When You Can Play Musical Hoops?
Provide enough hoops for each child to have one...and “Hoop-Dee-Do” let the fun never stop!
Discount School Supply® Product Recommendations:
Brawny Tough Activity Hoops - set of 15 (HOOPSET)
Zebra Hoops - set of 6 (HULA)
Cones with Holes - set of 6 (CONES)
Poles - set of 4 (POLES)
Hop Around Steps - set of 30 (HOPPA)
14" Brawny Tough Activity Hoops - set of 10 (HOOPLA)
25" Brawny Tough Activity Hoops - set of 5 (LGHOOP)
Jumbo Soft Foam Balls - set of 6 (SOFTFOAM)
Colored Bean Bags - set of 12 (CBB)
Colored Cones - set of 10 (SETC)

The activity hoop (HOOPSET) or hula hoop (HULA) is a popular play prop that begs to be played with OUTDOORS! It is usually twirled around the waist, limbs or neck but this “traditional hooping” can be difficult for young children to do. Here are some other ways to keep the fun going around, and around, and around, and around...
Hoop Chase: Roll hoops on the ground in an open area. Children have fun running, and catching the hoop, and then shouting, “I Gotcha!” Add to the fun by rolling more than one hoop at a time and see which one the child decides to chase.
Ring the Target: Set up a target such as a cone (SETC) or a gallon jug (filled with water or sand to weigh it down). Have children stand in another hoop (HOOPLA) a distance away from the target and toss or throw a hoop to land around the target. Start close and slowly increase the distance.
Make a Basket: Hang the hoop (“basket”) from a tree branch or some other spot where balls can be safely thrown. Have children stand in another hoop a distance away from the basket and toss or throw a ball (SOFTFOAM) or bean bag (CBB) through the basket. Start close and slowly increase the distance.
Around the World: Have children join hands in a circle with a hoop (LGHOOP) hanging from one person’s arm. When play begins, the person with the hoop must step through it and pass it to the next player without letting go of their hands. The next player does the same thing. The goal is to get the hoop back to the starting player with no one letting go of their neighbor’s hands. I like to add some music (“I Want to Hold Your Hand” by The Beatles) while the game is being played.
Hoop Jumping: Like rope jumping but using a big hoop (LGHOOP). Hold hoop in front of your body. Step over the hoop. Move your arms forward and swing the hoop over your head. Let the hoop hit the ground. Jump over the hoop, taking off and landing on both feet. Continue practicing these steps until you can continuously jump over the hoop.
Hoop Obstacle Course: Thread one pole (POLES) horizontally through lower level holes in two cones (CONES) to make a crossbar for jumping over. Place four hoops (HOOPLA) in a hopscotch pattern for children to jump into (first one hoop, then two hoops side by side, then one last hoop). Then make a tunnel with four cones (CONES) and two large hoops (LGHOOP) (lay two cones on their sides and across from each other, insert hoop into top notch. Duplicate with the other two cones and the hoop). Have children go through the tunnel on hands and knees. Now give children a hoop to roll in and out of a zigzag pathway made by placing 4-6 Hop Around Steps (HOPPA) in a row, four feet apart from each other. Finish the course by having children Ring the Target (see set up above).
Show Me: Ask children to place their hoop on the ground in front of them. Ask the children to, “Show me how you can jump into the hoop. Jump out of the hoop. Walk around the hoop. Put your elbow in the hoop. Put your whole body over the hoop. Stand inside your hoop. Lift the hoop over your head. On the count of three drop the hoop.” The challenges are limitless...and the children will give suggestions of what they can “show you!”
Hoop play promotes agility, coordination, cooperation, gross motor development, and physical activity. I have shared in older posts more games and activities that use the hoop. You can read them here:
Driving with Hoops!
Why Play Musical Chairs When You Can Play Musical Hoops?
Provide enough hoops for each child to have one...and “Hoop-Dee-Do” let the fun never stop!
Discount School Supply® Product Recommendations:
Brawny Tough Activity Hoops - set of 15 (HOOPSET)
Zebra Hoops - set of 6 (HULA)
Cones with Holes - set of 6 (CONES)
Poles - set of 4 (POLES)
Hop Around Steps - set of 30 (HOPPA)
14" Brawny Tough Activity Hoops - set of 10 (HOOPLA)
25" Brawny Tough Activity Hoops - set of 5 (LGHOOP)
Jumbo Soft Foam Balls - set of 6 (SOFTFOAM)
Colored Bean Bags - set of 12 (CBB)
Colored Cones - set of 10 (SETC)
Subscribe to:
Posts (Atom)

