Thursday, June 24, 2010

Ready, Set... RUN!

It’s official: This week marked the beginning of summer! Summertime means more time for outside play, and when children go outside they naturally want to move—and not just move, but run and run! Running is a fundamental motor skill that helps children move from one place to another. Once children learn how to crawl, creep and walk, running naturally follows in the developmental order of learning locomotor skills. And when children discover that they can run, they usually can’t get enough of it.

Running’s benefits include the promotion of gross motor skills, vigorous physical activity, and the development of the components of health-related physical fitness--muscular strength and endurance, flexibility and cardiovascular endurance. Here are some activities that will get you off to a running start in helping children in your classroom or home to master movement:

Run Like the Wind
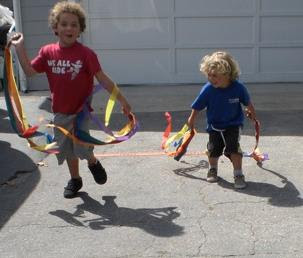
Set up boundaries using ropes or the Start to Finish Lines 15’-24’ apart. Have children run from one line or boundary to another holding a crepe paper streamer, scarf or Rainbow Dancing Wrist Band. They will automatically return to the start line and ask to do it again and again!

Flying Paper Plates & Newspapers
Set up boundaries using ropes or the Start to Finish lines 15’-24’ apart. Have children place a paper plates or sheet of newsprint (9” x 12”) or newspaper (11” x 12”) on their chest and start running. As they run faster and faster they will discover that the newspaper or plate will stick to their chest... a lesson in science, too! Another option is to put a paper plates on the palm of each hand and start running to see what happens.

Run & Roll
Set up boundaries using ropes or the Start to Finish lines 15’-24’ apart. Place a tumbling mat or playmat a few feet in front of the finish line. When you say, “Get ready, get set, run,” the child at the “start line” runs to the mat and falls, rolls or tumbles to a stop. Without even directing children to the start of the running course, they will be in line just panting and waiting for another turn to “Run and Roll.”

Non-Competitive Red Rover, Red Rover
Set up boundaries using ropes or the Start to Finish lines 15’-24’ apart. Two people at the finish line hold a sheet of newspaper (~ 22” x 24”) with two hands on each corner. When you say, “Get ready, get set, run,” the child at the “start line” (with the palms of his hands touching and pointing forward) runs and bursts through the newspaper!
Tails
Set up boundaries using ropes or cones in the available space. Each child tucks a scarf or Rainbow Dancing Wrist Band ribbon into their waistband behind their back. The scarf or ribbon is now their “tail.” The game starts when the music starts and the children run in the available space. The game is played like tag, but instead of tagging each other, children pull the scarves or ribbons out of others’ waistbands and drop them on the ground. The child whose scarf or ribbon is pulled, picks up his scarf (tail), goes to “the tail repair area” (a designated spot, such as a classroom door, tree, etc.) to replace the scarf in their waistband. Once the scarf is secure in their waistband, the child returns to the game and resumes pulling “tails.” The game ends when the music stops. This group game promotes cooperative play, vigorous physical activity and offers lots of laughter!

Thursday, June 10, 2010

Play It Safe!

The National Safety Council has designated June as National Safety Month.

It is the responsibility of adults who care for and teach young children to ensure that outdoor and indoor play areas and equipment are safe and free from danger. The fact that children are attempting new physical challenges makes it impossible to eliminate all risks, but much can be done to the environment itself to reduce the number of injuries. Here are some tips to safer play this summer:
  • In the Heat: Games and activities played in the heat should be shortened and more frequent water/hydration breaks should be instituted. On both sunny and cloudy days use a sunscreen with an SPF of 15 or greater that protects against UVB and UVA rays.

  • Movement: Remove hoods or drawstrings than can get caught on equipment and have all children run in the same direction so they don’t run into each other. Most young children are not yet skilled in dodging objects while running.

  • Safe Stops: Teachers should not ask children to run to a wall or fence or any other immovable object. Most young children cannot yet judge distances or stop quickly. Some children may be likely to run full speed into the wall. Place a tumbling mat or playmat several feet in front of any wall or other immovable object. This gives children a great place to fall, roll or tumble as they stop.

  • Jumping: Children should not jump from distances that are more than half their height. Teachers may instruct, "You can jump off everything that is lower than 4 feet tall," as they let the children help find and measure structures and places that are safe and appropriate jumping places. Teach children how to land softly on two feet when jumping by bending their knees. Show children how to break falls by putting their arms in front of their bodies.
  • Equipment: The indoor and outdoor play equipment should suit the children’s ages and developmental abilities. Children will not usually climb up a structure or piece of equipment if they think they cannot not get down on their own initiative. If they do, teachers may choose not “rescue” children by lifting them off of the piece of equipment or climbing structure, as rescuing may encourage the behavior. Ask them to go back down the way they came up or direct them to a safe place to descend. Of course, an adult would remain present to coach the child patiently down by helping the child anticipate the surface below.

  • Climbing: Did you know that when you lift young children up to a piece of equipment (i.e. monkey bars, etc.) they often do not yet have the cognitive connections to internalize that they are not moving across the monkey bars with their own body and upper arm strength? Many unfortunate “playground accidents” happen when children think they can accomplish a movement task on their own. Limit the number of children using a climbing structure at the same time. For example, learning to wait on the ground before ascending the ladder to a slide gives the child in front of them time to begin sliding or to come back down the ladder. It also eliminates opportunities for horseplay at the top of the slide.

  • Playground Regulations: The playground should have safety-tested mats or loose-fill materials (shredded rubber, sand, wood chips, or bark) maintained to a depth of 12 inches. This type of surface absorbs the impact of a jump or fall. The protective surface should be installed at least 6 feet in all directions from the equipment. Swings require 16 feet of clear area in front and behind with 6 feet free on each side. Equipment should be carefully maintained. Open “s” hooks or protruding bolt ends can be hazardous. Make sure children cannot reach any moving parts that might pinch or trap any body part. All indoor climbing structures should be surrounded by a mat at least 2 inches thick and 3 feet wide. Place these structures at least 4 feet away from walls, doors and other solid structures. Teach children how to climb and maneuver on large structures.

  • Riding: Children should wear trike helmets when riding wheel toys and trikes. When purchasing a helmet, look for a label or sticker that says the helmet meets the CPSC safety standard.

Watch the children at all times during physical activities. Adults should position themselves near the most populated pieces of equipment. Teach young children the rules of safety and watch children for safe and appropriate behavior. Notice changes in a child’s activity level that might indicate a health issue.

Use your own good judgment in anticipating and preventing anything that might be unsafe for the children. Balance fun and safety in children’s play!

Wednesday, May 26, 2010

Why Play Musical Chairs When You Can Play Musical Hoops?

Have you ever watched children play Musical Chairs? When the music stops, the kids push and shove to get to a chair. The first child who doesn’t find a seat sits out of the game, all alone. As the game continues, the kids can get more and more aggressive, stopping at nothing to be the winner. In the meantime, the losers may feel left out, bored or upset. This game is an example of a competitive game. Young children feeling left out is one of the reasons I like to recommend cooperative games for early learning, where every child is a winner.

Competitive games can pit children against each other; during active games children may learn that, if you shove, push, hit or trip, you might gain advantage over the other players and win. Competitive games with just one winner means a whole group of losers. Young children generally play games to have fun and be involved; they don’t want to be quickly eliminated, rejected, left out, hurt physically or emotionally. (Who does?!)

Cooperative games include everyone. Every child is allowed to stay involved, there’s no pressure to win, no fear or anxiety about losing. Musical Hoops is a cooperative game for young children that helps promote self-esteem, sharing, kindness and teamwork as well as develops spatial awareness, gross motor skills and listening.

Musical Hoops

Materials Needed:
One hoop per child
Music/CD player and CD

How to play:
1. Scatter hoops in available space either indoors or outdoors.
2. Each child stands beside a hoop.
3. Start the music and instruct the children to walk around the hoops, making sure not to touch them while the music is playing.
4. When the music stops, each child steps into the nearest hoop. Tell them that it’s fine if more than one child ends up in one hoop. In fact, encourage it!
5. Start the music again and remove a hoop or two. When the music stops, the children step into the nearest hoop.
6. The game continues with you starting and stopping the music, gathering up more hoops and the children scrambling to all fit into the remaining hoops.
7. Musical Hoops ends with one or two hoops on the floor and all of the children working together to make sure everyone finds a place inside a hoop (even if it’s just one foot inside the hoop). It’s crowded but lots of fun!

Furthermore:
• Vary the locomotor skill children use to move around the hoop each time you restart the music. Ask the children to jump, gallop, skip, march or walk on tiptoes.
• When the music stops and children stand in the hoops, ask them to count and/or show with their fingers the total number of people in their hoop.

Thursday, May 13, 2010

Trike Traffic Town

May is National Bike Month. A fun way to celebrate with young children is to go outside and set up a Trike Traffic Town course on the blacktop or concrete using cones, traffic signs, chalk road markers, directional arrows and children on trikes, scooters or any favorite wheeled toy. (Don’t forget to provide each child with a properly fitted child-size or toddler-size helmet.) This activity also provides a perfect time to reinforce bike safety and the “rules of the road” on your playground.

Before children attempt pedaling through Traffic Town, teachers should ask them to stand shoulder-to-shoulder on the side of the course and watch as you direct one child in demonstrating the how-to’s of the course. Verbally describe directions for each part of the course, i.e., “ride around the cones,” etc.

Next, line up the first riders on their trikes, at the start of the course and tell them to follow the leader, while you guide them safely through the course. Emphasize that Traffic Town is not a race and they should not speed through the activities. Stress to the children to keep some space between them. If a traffic jam does occur, tell the children to please wait patiently and not to rush their fellow trike riders.

Materials Needed:
10 Colored cones
6 Cones with Holes,
6 Traffic Signs,
Arrow Spots
2 Nylon Jump Ropes
Bubble Wrap or Textured Packing Material
Sidewalk Chalk

Traffic Town Course

1. Put the GO Traffic Signs, in the hole in top of a cone. Children on trikes begin here. Teachers may want to stagger the starting time of each child.

2. Put ONE WAY Traffic Signs, in hole in top of a cone. Place the 6 Colored Cones about 4-6 feet apart from each other. Using Sidewalk Chalk, make directional arrows around the cones to make a zigzag slalom course. Following the arrows, the trike riders zigzag from the right of one cone to the left of the next, and so on until they complete the 6 cone slalom course.
3. Place 2 ropes horizontally on the ground, parallel to each other and 2-3 feet apart to create a crosswalk. Put the yellow School Crossing Sign in the hole in top of a cone. Set it in front and to one side of the ropes. The trike riders continue traveling but must stop and wait for “pedestrians to cross” (other children or parents/teachers.) If no one is in the crosswalk, riders can proceed forward over the ropes.

4. Place several long strips of bubble wrap on ground. Put the yellow SLOW Sign in the hole in the top of a cone. Set it in front and to one side of the bubble wrap. Tell children that there is “Roadwork in progress. It’s a bumpy road,” as they drive their vehicles over the bubble wrap.

5. Set up 4 colored cones side by side horizontally in the middle of the traffic town. Put the DO NOT ENTER Sign in the hole in top of a cone, and place it in front of the 4 cones. (Tell the children that “The road is blocked! It looks like there was a rock slide!”) Place the Arrow Spots on the ground in front and to the side of the cones, indicating the direction the drivers must turn to maneuver their trikes around the blocked roadway.

6. Put the STOP Sign in the hole in top of a cone. Here. “We’ve come to the end of Traffic Town. Let’s do it again!” Using the remainder of the Arrow Spots, direct trike riders back to the beginning of the course.

Children will want to repeat traveling this popular roadway over and over again. Be alert to children traveling too fast and not being able to manage the curves safely. Children at this young age are figuring out what their muscles can and cannot do.

This activity promotes...

  • Gross motor development (using the large muscles of the legs and arms)
  • Visual discrimination (ability to recognize the traffic signs and arrows to follow directions)
  • Bilateral coordination (using legs to pedal the trike and arms to steer the trike)
  • Spatial awareness (children moving in the space with other children on trikes)
  • Traffic Town also fosters cooperative play and turn taking as well as dramatic play while preschoolers pretend to be “drivers” and following the road.

    Thursday, April 29, 2010

    Ducking Out of Duck, Duck Goose

    The rules to play the traditional children’s game of Duck, Duck, Goose are generally that all players except "IT" sits in a circle. IT (sometimes called the "goose") walks around the outside of the circle, behind the players’ backs while tapping gently on each of the seated players’ heads, saying “Duck...Duck...Duck...” each time they tap a head. When IT taps a player's head and says, “Goose!” the new "goose" jumps up and chases the first child around the circle. If the new goose doesn’t tag the other child before s/he reaches the open seat in the circle, IT takes the place in the circle and the new goose resumes the game by tapping heads. (If the new goose did happen to tag IT, s/he gets back to his/her spot in the circle and the first child remains IT.)

    However, I've noticed sometimes the person who is IT doesn’t just “tap” a child’s head gently, they “hit”! Also, children who don’t want to be “hit” may put their hands on top of their head and lower their heads into their laps. Other children may follow that child’s lead and then there are no heads to “tap,” indicating that no one wants to play the game.

    I want to share with you what I feel is a more developmentally appropriate way for young children to play this game in an early childhood classroom or home setting.

    A Tisket, A Tasket, My Fruit & Veggie Basket
    Materials Needed:
    Small basket filled with plastic fruits and vegetables
    How to play:
    1. Sit young children (players) in a circle.
    2. One child is chosen to hold the fruit basket and walk around the outside of the circle, behind the players’ backs while the group chants:

    A tisket, a tasket,
    My fruit and veggie basket.
    I went walking down the lane,
    And on the way I dropped it,
    I dropped it, I dropped it...

    4. On the last verse, the child walking around the circle drops the basket behind a player’s back.
    5. That player picks up the basket and runs after the first child, who is running back to the open place in the circle.
    6. If unable to tag the player before s/he gets to the open spot, the new player holding the basket must now walk around the outside of the circle, dropping the basket of fruits and veggies behind someone who has not yet had a turn.
    7. The game ends when every player has had a chance to hold and drop the basket.

    Another way to play this game in a similar way is to have the first child hold a small cardboard pizza box and walk around the outside of the circle, behind the players’ backs while the
    group chants:

    Pizza delivery in the box,
    Pizza delivery piping hot,
    Pizza delivery ready or not.
    Ding, dong, PIZZA DELIVERY!


    On the last words, “Pizza Delivery,” the child drops the pizza box behind a players’ back and the game continues per the steps above.

    Preschool children love the element of surprise that these games offer. Whose back is IT going to drop the basket or pizza box behind? They also love to play chase and the activity of running and increasing heart rates is very beneficial for physical health and development.

    These activities are also great for teachers to use when children are in transition -- i.e., waiting for parent pick up or for their group’s turn at the art center in the classroom, etc. Remember young children do not need to engage in competitive games with definite winners and losers. Having fun and playing cooperatively is a great main objective!

    Thursday, April 15, 2010

    Kids on Parade! Rhythm Stick Fun

    Rhythm sticks or clave (klah-vey)—a Latin name for rhythm sticks—are indisputably one of the best first instruments for young children.

    Rhythm sticks are members of the “percussion family” of instruments—which are musical instruments sounded by striking, shaking or scraping—and are tapped together to make a sound. Small percussion instruments are the most appropriate for children ages 2-7 and include the triangle, maracas, bells, tambourines, drums, cymbals and sand blocks.

    Rhythm sticks are a natural extension of the sounds children make with their hands (clapping) and feet (stamping). Basic rhythmic concepts about beat, tempo and patterns are great for teaching to young children and can be experienced through a variety of fun activities, including playing rhythm sticks. When rhythm sticks are used in musical activities for young children, the process, rather than the product, is the important goal. Children thrive on the familiar; they enjoy the security of repetition and it’s an essential component for building basic skills and understanding.

    It is important that rhythm sticks for the 2- and 3-year-olds be the appropriate size. Chunky Rhythm Sticks from Discount School Supply. are specifically made for little hands and fingers to easily grip and hold. This set includes 24 sticks or enough for 12 children with one for each hand.

    Rhythm Stick Play: Objectives/Learning Outcomes
    Playing and using rhythm sticks promotes and develops the following:

    • Small motor development—using the small muscles of the hands and fingers
    • Eye-hand coordination—eyes and hands working together smoothly
    • Dexterity—skill and ease in using hands
    • Eye tracking—eyes being able to follow an object as the object moves in space
    • Directionality—the inner sense and knowledge of where things are in relation to the body
    • Auditory discrimination—being able to hear and identify differences in sounds
    • Listening skills—ability to follow verbal directions
    • Coordination—parts of the body moving smoothly together
    • Rhythm—aspects of music having to do with time; patterns of sound perceived in relationship to a recurring beat
    • Beat—recurrent throb or pulse in music; important rhythmic skill to develop before the age of seven as the ability to keep a steady beat is linked to linguistic development
    • Tempo—the speed of music
    • Thinking processes—creative thinking and problem solving; develops memory (pattern and sequence)
    • Crossing the midline—occurs when left or right arms or legs cross over the center of one’s body and promotes communication between the brain hemispheres


    Rhythm Stick Play: Rules
    It is helpful to establish rules that will make the playing experience a happy and enjoyable one for both adults and children. As the teacher or leader of the activity, do not pass out the rhythm sticks until you have made clear what your expectations are regarding use of the rhythm sticks. The teacher or leader should demonstrate the activity first. If a child does not use his or her sticks properly or safely, an appropriate consequence might be to take them away for a short period of time, allowing that child to observe and rejoin when he/she feels able to follow the rules.
    The following are some suggested rules and ideas for classroom and home activities using rhythm sticks:
    1. Children sit cross-legged in a scattered or circle formation, ensuring that each child has his or her own personal space.
    2. An adult or class helper is the keeper of the bin of sticks and walks around the group to allow each child to pick two sticks.
    3. Rhythm sticks are passed out and children lay them on the ground in front of them and put their hands in their lap.
    4. Upon teacher or leader instructions, or when the music starts, children can pick up their sticks and follow your lead.
    5. When the music stops or the teacher says “freeze” and all activity ceases. If children are sitting, the sticks go back on the ground and hands go in their laps.
    6. For organized clean up, an adult or class helper brings the bin around and instructs the children to put the rhythm sticks in the bin.

    Rhythm Stick Play: Activity Idea
    Pass out the rhythm sticks—, have children practice following a leader as they keep time to the music. Ask the children to stand up and get ready to march (a precise type of walk, accompanied by lifted knees and swinging arms) in the rhythm stick band! The teacher or a child can be the leader of the parade who marches in front, setting the direction and pace of the parade. Select a musical selection with a short, regular beat for a melodic and rhythmic background to accompany the sticks.

    Thursday, March 11, 2010

    Parachute Play!

    Open it up, spread it out and the kids will come running! A parachute or play canopy is big, colorful and inviting. In preschool classes and teacher trainings, I’ve been sharing games and activities that promote gross motor skills, physical activity, lots of smiles and tons of fun. Here are some parachute activity ideas you may want to try with your own children or the children in your classroom:

    Brave the Waves and Pop the Bubbles
    While sitting down around the outside edge of the parachute, have children grasp the parachute and shake the parachute up and down. Select two or three children to crawl (on hands and knees) on top of the parachute and pop the “bubbles” that are created when everyone moves their hands up and down making “waves.”


    Hi and Hello
    While standing and holding the parachute, ask children to follow your directions with the correct movements: “Touch your toes, ready... lift!” Children lift the parachute up and over their heads. While the parachute is inflated encourage children to greet one another by waving with one hand while saying “Hi or Hello” as the parachute deflates. Repeat the activity, but this time wave with the other hand and to friends on another side of the parachute.


    Mushroom
    While standing and holding the parachute, ask children to “Touch your toes, ready... lift!” When the parachute has reached its apex, instruct children (while still holding parachute) to quickly walk toward the center of the inflated chute and look up at the mushroom cap above them. As the parachute deflates, direct children to walk backwards to their original positions while still holding onto the parachute.


    Dome Camping Tent
    While standing and holding the parachute, ask children to “Touch your toes, ready... lift!” Direct children to walk forward one step while pulling the parachute behind them and sitting down on the edge of the parachute. By sitting down inside the parachute they seal as much air as possible while creating a dome tent.


    Popcorn
    Children stand around the parachute, holding it with an overhand grip. Throw 6 -10 foam balls into the middle of the parachute. Tell the children that it is time to make popcorn. The balls are the kernels of popcorn, and if they shake the parachute hard enough, the corn will start to pop. Designate one child to be the “Popcorn Police” whose job it is to retrieve the kernels (balls) that have flown off the parachute and throw them back onto the parachute. Children keep popping the corn until they are “too pooped to pop.”


    High-5 Exchange
    Children stand around the parachute, holding it with an overhand grip. Ask two children across from each other to let go of the parachute. These two children will exchange places, walking beneath the inflated parachute, while the group lifts the parachute on the teachers' command. As they pass each other under the parachute, they can slap palms with a “High 5” as they go to their new place on the other side of the parachute. Continue playing until everyone has had a turn to exchange places.

    Young children in your classroom or home love to repeat these activities. Remember that they learn best through repetition and experience--and so do you! The more and more you play with the parachute the more confident you will become in using this outstanding piece of equipment as part of your daily physical education or movement activities.